My parents moved our family to San Diego when I was 5 and with that upgrade came new expenses. We lived in a small apartment where I shared my room with my sister. It wasn't until high school that we were able to rent a house, with my own room! With this process of adapting, we were almost forced into frugal decisions. However I rarely felt inconvenienced by these sacrifices because they just became a way of life. Now in my early 30's, I find myself empowered by the friendships I have with like-minded people who support environmentalism with the same easy approach. I am constantly learning better ways and deeper information from these relationships.
Since Californian media has been slightly more vocal about the declining state of our serious drought, I have seen more general curiosity. Many of this interest is generated from young people who live in small urban areas, who want to conserve but don't know what is possible.
I wanted to share a few things I have implemented in my home with hopes that it will activate others to make a few simple, but effective changes.

One thing I (sadly) know to be true... Americans are lazy people. More often than not, we will take the path of least resistance. Therefore, I've found the best way to get actual results is through perpetual participation. By this I mean, habit. Here are some happy habits to consider:
1. Recycle- duh.
In addition to 1 trashcan in my kitchen, I have 2 containers for recycling. This ratio creates a larger opportunity to recycle, than to throw out. They are right next to my chopping block and sink, so it's super easy to rinse containers and separate waste.
Many people have regular bin removal service from the city, but don't take part because they are unsure what can be recycled. Here is a complete directory, supplied by EDCO. Your local waste management will even send you a free magnetic guide so you can keep it on your fridge.

2. Reduce & Re-Use
Once you start recycling on the regular, it's nearly impossible not to notice all the really unnecessary packaging that comes with everything! You can help reduce the amount of waste by cutting back on disposable items such as plastic bags, ziploc bags, and coffee cups. Invest in some canvas bags. They are the perfect way to advertise your favorite shop/designer/snarky comment. Put these bags in the trunk of your car so you have them ready at the market. There are also genius mini-bags which are great for your handbag in case you are using public transit.

Other ideas: Take Tupperware to work. IKEA sells a complete set for $5, so no excuses. Kill the Cup and bring your own. Whenever possible, walk. Use only enough. Wait until you are completely out of something to get more, or use what you have. Mend your clothes. Ride share.
3. Be Water Conscious
Now more than ever, we need to be mindful of the amount of water we are using. Unfortunately most people are only driven to take action when access is limited. It's a hard fact that we are indeed, already in a very scarce situation. Our city is making an attempt to conserve by enforcing water restrictions, but that is not enough. You have to train yourself to restrict your own use both inside and outside of your home. Plenty of routines can be adjusted to preserve, but in addition I like to operate using a mental hierarchy of use so that I get the most out of it. It goes like this: water humans first, pets second, plants third. My leftover water (from bottles or glasses since lets be honest, we don't always finish it) can be given the the cats. Their leftover bowl water, when being refreshed, can be given to the plants. No drop wasted.

Outside: I have installed a rain barrel to collect water which is used to feed the garden. My husband came up with this idea, educated by the kind, informative folks over at SD Drum and Tote. We also learned about a reimbursement program which actually returns the majority of cost from purchasing the set up. The barrels they provide there are recycled containers from large companies that use them for infusing olives and other non-hazardous food items. Installing the spout does require some small tools but there are other options available if you don't think you can swing that. I did not need to connect the barrel to house gutters, and if you are living in an apartment with a patio or balcony, you wouldn't need to do so either. You can buy a disc which broadens the collection range so you capture more water, or opt for the more decorative rain chains which can hang from the rooftop. After one big rain in May, the barrel was completely filled and will be used for many many months to water our plants. Go see these guys at SD Drum, they have lots to offer!
4. Be Green, Eat Green
I know living in the city often means you don't get a yard. In my case, my got lucky and share a space with the neighbors up front. The owner of the property appreciates sustainable living and before we even moved in, installed artificial grass. This has turned out to be a blessing since I am pretty allergic to grass and the turf allows me to lay about without getting itchy. It also completely eliminates the need to water large areas outside. If you have access to green space, it is worth asking your landlord about alternatives. Often times companies will provide a discount or incentives for removing grass and replacing spaces with turf.

You may also consider substituting landscaping for rock, sand, or wood chips. This is often times referred to as Xeriscaping, and a lot of gorgeous ideas can be found on Pinterest. I have many drought tolerant plants that are beautiful and low maintenance, all of which are happy in containers. Some of my favorites include: hopseed bush, agave, bougainvillea, aloe plant, lantana, butterfly bush, sage, and too many succulents to list. I recently upgraded the container garden (built out of re-purposed wood crates) to include edibles. I now have romaine lettuce, grapes, spinach, blackberries, and tomatoes growing alongside rosemary and nasturtiums (which may be considered a weed but are useful in salads.)
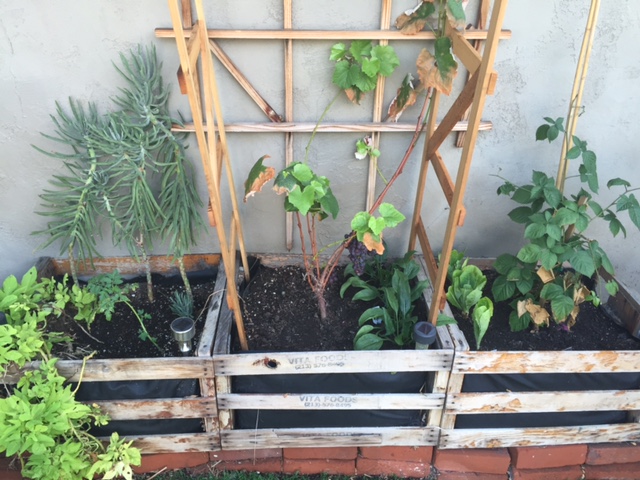
ALL of these things can be grown in a window box, or in small pots in the sun.

5. Reciprocate/ Re-allocate
So much of city living feels isolating and detached. Living behind a house, for instance, really separates the opportunities I have to meet my neighbors. I am sure apartment dwelling feels quite the same way. However, I've found that when initiative is taken, I am often times rewarded in the most sincere ways. Initiative doesn't have to look like a big ole act of kindness, or a giant event. In fact, this is probably a turn-off more than anything. Small ways to generate positive activity in your community should be easy and authentic. My favorite example is hosting a yard sale, which I try to do at least twice a year. I love weening out unused items on the regular, and there's something neat to having other people who live in close proximity really enjoying and benefiting from those discards. Plus, a little extra pocket money is always great. Whatever is left over is always taken to Goodwill down the street, which creates jobs and promotes recycling.

Recently, my husband and I spent a Sunday making a plastic bag dispenser for our street. We have tons of dog walkers who don't always do their duty after their pet doodie's, so we came up with a quick idea and just did it. We used an old bird feeder, hand-painted a sign, and filled it up with old grocery bags. We turned a small abandoned section of the front yard, to a useful little opportunity for people to take notice and get involved. Hopefully this will provoke the residents of Hillcrest to clean up the streets.

There are lots of ways to re-allocate your junk to those who still find purpose in it. Little Free Libraries are popping up, ladies are hosting clothing-swap parties, and I've heard of tool sharing between strangers & neighbors instead of so much consumerism. I believe these small acts of reciprocity can make a big impact. In the future, I plan to coordinate a community donation center that provides a creative space for this process. In the meantime, I hope some of these suggestions will be firestarters for your own Eco-practices.


